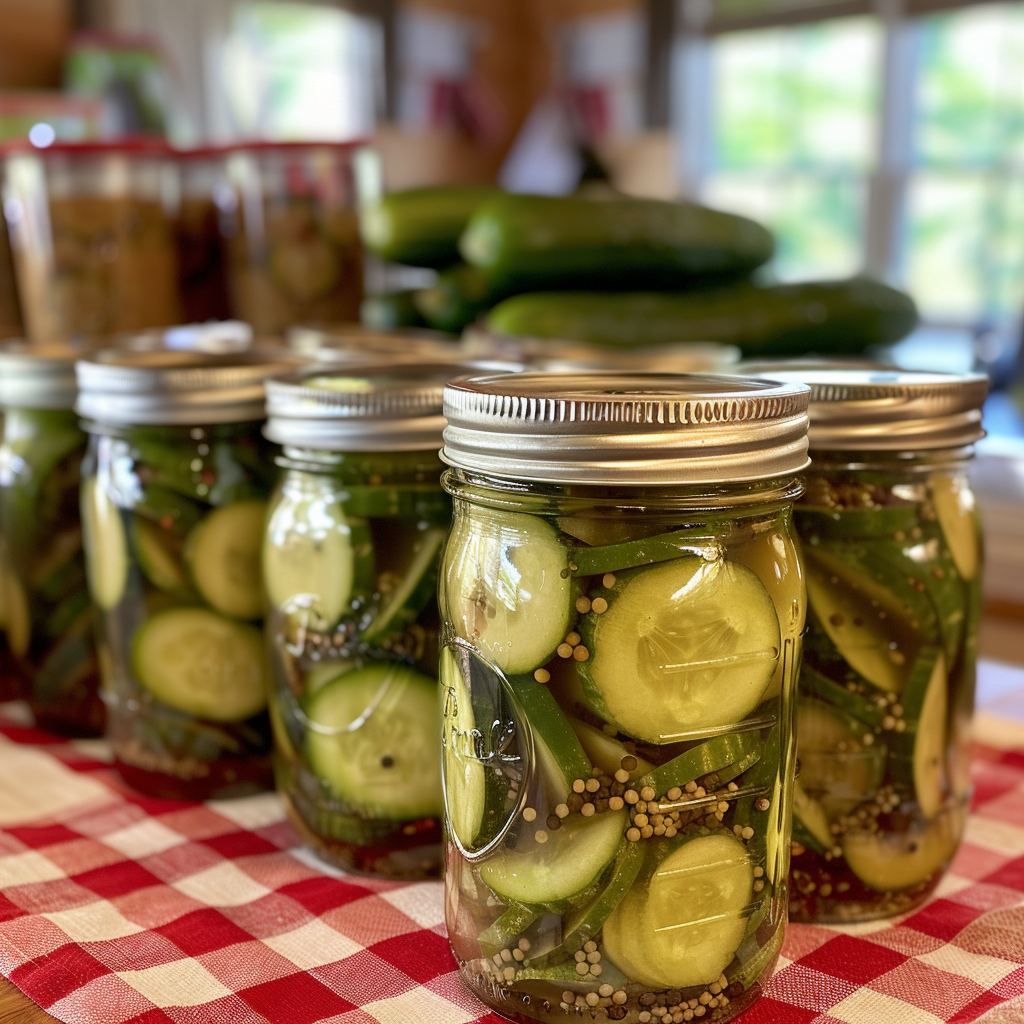
Traditional Sweet Pickles Recipe: Simple Steps to Tangy Goodness

Share
The Soothing Process Of Pickle Making
There’s something incredibly soothing about the process of making sweet pickles. I love how it’s just me, fresh cucumbers, and a few simple ingredients that come together in such a satisfying way. From slicing the cucumbers to preparing the sweet brine, every step feels like a connection to tradition. The simplicity of it all, knowing that in a short time I’ll have jars filled with crisp, sweet pickles, is a joy in itself. There’s a quiet contentment in this ritual, knowing that with just a bit of time and care, I’ve created something that will bring pleasure to meals throughout the year.
Did You Know?
Sweet pickles have been enjoyed for generations and are a staple in many American households. They are known for their sweet and tangy flavor, making them a popular addition to sandwiches, burgers, and salads.
Yield: 7 quarts
Ingredients:
- 8 pounds pickling cucumbers (4-6 inches long)
- 1/2 cup pickling salt
- 6 cups white vinegar (5% acidity)
- 6 cups granulated sugar
- 2 cups water
- 1 tablespoon mustard seeds
- 1 tablespoon celery seeds
Instructions:
Personal Tip: Soaking the cucumbers in salted water is a crucial step. It draws out excess moisture, ensuring that your pickles stay crisp and crunchy.
1. Prepare the Cucumbers:
- Wash and Slice: Thoroughly wash cucumbers. Slice them into 1/4-inch rounds.
- Salt and Soak: In a large bowl, combine cucumber slices with pickling salt. Cover with water and let stand for 4-6 hours or overnight in the refrigerator. This helps to crisp the cucumbers.
Personal Tip: Sterilizing your jars is non-negotiable. It’s the best way to ensure that your pickles stay fresh and safe for consumption.
2. Prepare the Jars:
- Sterilize Jars: Wash jars, lids, and bands in hot, soapy water. Rinse well. Place jars in a large pot, cover with water, and boil for 10 minutes. Keep jars hot until ready to use.
- Prepare Lids: Heat lids in simmering water (not boiling) until ready for use. Do not boil. Set bands aside.
Personal Tip: The mustard seeds and celery seeds are what give these pickles their distinctive flavor, so don’t skip them!
3. Make the Brine:
- Combine Ingredients: In a large pot, combine vinegar, sugar, water, mustard seeds, and celery seeds.
- Boil Brine: Bring the mixture to a boil, stirring until the sugar is dissolved. Reduce heat and simmer for 5 minutes to allow the flavors to blend.
Personal Tip: After soaking, be sure to rinse the cucumbers well to remove excess salt. This ensures that your pickles have the perfect balance of flavors.
4. Prepare the Pickles:
- Drain and Rinse Cucumbers: Drain cucumber slices and rinse under cold water to remove excess salt. Drain well.
- Add Cucumbers to Brine: Add the drained cucumber slices to the pot with the brine. Simmer for an additional 5 minutes, stirring occasionally to ensure even coating.
Personal Tip: When packing your jars, be sure to leave enough headspace. This allows the pickles to expand slightly during processing.
5. Pack the Jars:
- Pack Pickles and Brine: Using a ladle, pack hot cucumbers into hot jars, leaving 1/2-inch headspace. Pour hot brine over the cucumbers, maintaining the 1/2-inch headspace. Remove air bubbles by running a non-metallic spatula around the inside of the jar.
- Remove Air Bubbles: Run a non-metallic spatula around the inside of the jar to remove air bubbles.
- Wipe Rims and Apply Lids: Wipe jar rims with a clean, damp cloth. Apply lids and screw bands until fingertip tight.
Personal Tip: Processing the jars in a boiling water bath ensures a good seal, which is essential for long-term storage.
6. Process the Jars:
- Boiling Water Bath: Place jars in a boiling water canner. Ensure they are covered by at least 1-2 inches of water. Process for 10 minutes (adjust time based on altitude).
- Cool Jars: Remove jars and place them on a towel to cool for 12-24 hours. Do not disturb while cooling.
- Check Seals: After cooling, check seals. Lids should not flex up and down when pressed. Store in a cool, dark place for up to a year.
Nutritional Information (Per Serving - 1 round):
Calories: 20, Protein: 0g, Carbohydrates: 5g, Fat: 0g, Sugars: 4g
Why Use Pickling Salt for All Pickle Recipes:
- Purity: Pickling salt is free from additives like iodine and anti-caking agents that can cause cloudiness or off-flavors in the brine.
- Dissolution: It dissolves easily and completely, ensuring even distribution and preventing residue buildup.
- Consistency: Ensures consistent flavor and preservation quality across all batches of pickles.
How This Applies to Different Pickling Recipes:
- Cucumber Pickles: Whether you’re making dill, bread and butter, or sweet pickles, pickling salt ensures a clear brine and consistent texture.
- Vegetable Pickles: For mixed vegetable pickles, using pickling salt helps maintain the bright colors and crunchiness of the vegetables.
- Fruit Pickles: In recipes like pickled peaches or watermelon rind pickles, pickling salt helps preserve the delicate flavors and clarity of the pickling liquid.
- Relishes and Chutneys: For relishes and chutneys, pickling salt ensures the final product remains visually appealing and free from unwanted additives.
Kitchen Tips, Great Ideas, How to Save Money:
- Choosing Cucumbers: Use fresh, firm pickling cucumbers for the best results. Avoid waxed cucumbers as the wax can interfere with the pickling process.
- Salt and Soak for Crispiness: Soaking the cucumbers in salted water helps to draw out excess moisture, ensuring crisp pickles.
- Sterilization is Key: Always sterilize jars and lids to prevent contamination and ensure a long shelf life.
- Balanced Spices: The combination of mustard seeds and celery seeds gives sweet pickles their unique flavor. Adjust spices according to your taste.
- Headspace is Important: Leave the correct amount of headspace to allow for expansion during processing and to ensure a proper seal.
- Remove Air Bubbles: Removing air bubbles prevents trapped air, which can lead to spoilage. Use a non-metallic utensil to avoid damaging jars.
- Proper Sealing: Ensure lids are fingertip tight, not over-tightened, to allow air to escape during processing.
- Storage Conditions: Store sweet pickles in a cool, dark place to maintain quality and prevent spoilage. Avoid storing near heat sources or in direct sunlight.
- Labeling Jars: Always label jars with the date and contents. This helps keep track of inventory and ensures you use older jars first.
- Reuse and Recycle: Save money by reusing jars from store-bought products. Just ensure they are properly sterilized before use.
What Foods Are Sweet Pickles Especially Tasty With?
Sweet pickles are incredibly versatile, and I love keeping a jar handy in the fridge for a quick snack. They’re perfect when served cold with slices of sharp cheddar cheese and some crisp crackers—a simple yet satisfying combination that’s great for entertaining or just enjoying at home. On road trips, these pickles are always packed, providing that sweet and tangy crunch that pairs perfectly with a variety of snacks. But where these pickles really shine is in sandwiches. Whether it’s a classic ham and cheese, a hearty turkey club, or even a gourmet grilled cheese, sweet pickles add that extra layer of flavor that makes the whole sandwich pop. Their appealing flavor makes them a hit with just about everyone, making them a must-have in my pantry.


