


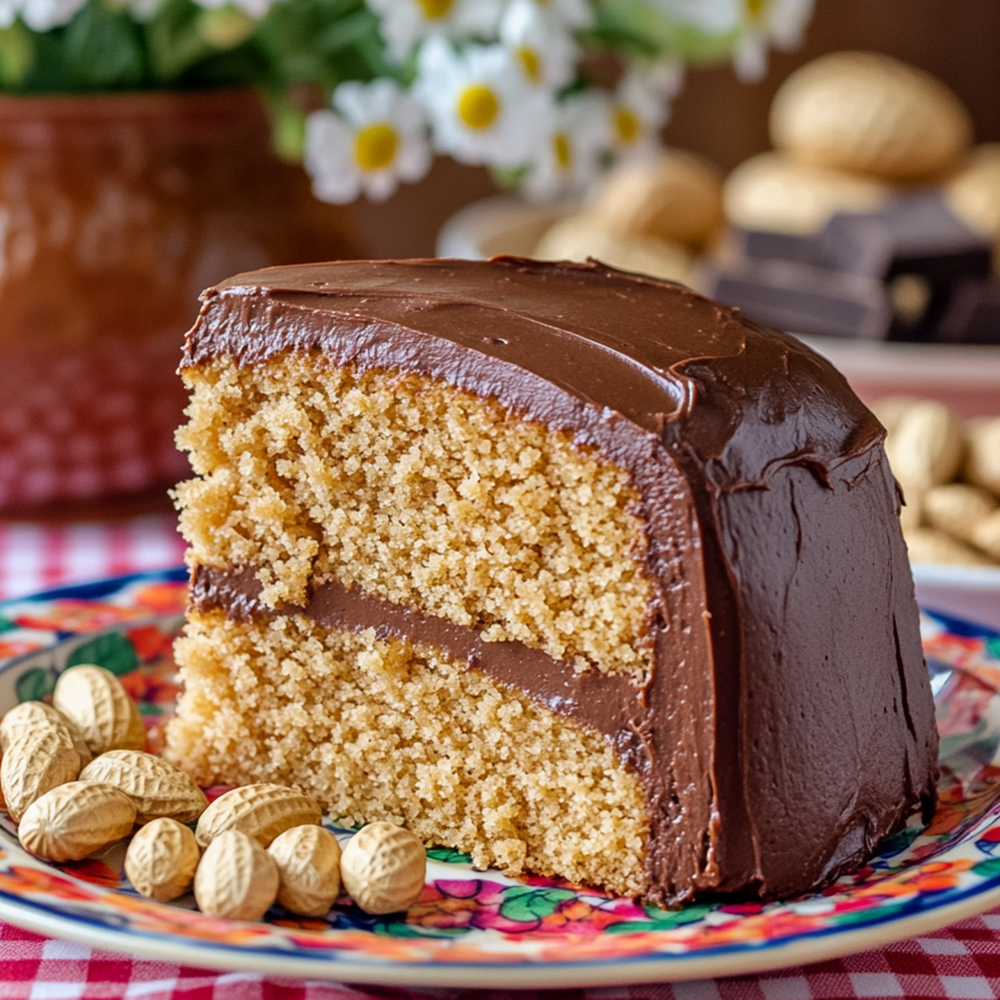
Peanut Butter Layer Cake with Dark Chocolate Buttercream: A Family Favorite
Share
For the Love of Peanut Butter and Chocolate
There’s just something about the combination of peanut butter and chocolate that’s absolutely irresistible. It’s no wonder Reese’s Peanut Butter Cups are so popular—they’ve perfected that sweet and salty balance. This cake follows along those same flavor lines. Whenever there’s a food event or someone in the family specifically requests it, I know this Peanut Butter Layer Cake with Dark Chocolate Buttercream Frosting is going to be a hit. It’s not a cake I make all the time, but when I do, it’s because I know the rich, nutty peanut butter cake paired with the creamy, bittersweet chocolate frosting will satisfy everyone’s craving for that classic combination. It’s a guaranteed crowd-pleaser.
Did You Know?
When it comes to choosing peanut butter for baking, natural peanut butter is often the best choice. Unlike processed peanut butter, which can contain added sugars, hydrogenated oils, and preservatives, natural peanut butter typically consists of just peanuts and perhaps a pinch of salt. This means you’re getting a purer, more intense peanut flavor, without the additives that can detract from the taste and texture of your baked goods. However, because natural peanut butter lacks these preservatives, it’s important to store it properly. Always refrigerate natural peanut butter after opening to prevent it from going rancid, as the natural oils in peanuts can spoil if left at room temperature for too long.
Yield: 12 servings
Ingredients:
For the Peanut Butter Cake Layers:
- 1 cup natural peanut butter (smooth)
- 1/2 cup unsalted butter, softened
- 1 1/4 cups granulated sugar
- 1/2 cup brown sugar
- 3 large eggs
- 2 teaspoons vanilla extract
- 2 1/2 cups all-purpose flour
- 1 tablespoon baking powder
- 1/2 teaspoon baking soda
- 1/2 teaspoon salt
- 1 cup buttermilk
For the Dark Chocolate Buttercream Frosting:
- 1 cup unsalted butter, softened
- 2 1/2 cups powdered sugar
- 1/2 cup cocoa powder (preferably dark cocoa)
- 1/4 cup natural peanut butter (smooth)
- 1/2 cup dark chocolate, melted and cooled
- 1/4 cup heavy cream (more as needed)
- 2 teaspoons vanilla extract
- Pinch of salt
Instructions:
Prepare the Cake Layers:
Preheat your oven to 350°F (175°C). Grease and flour two 9-inch round cake pans, then line the bottoms with parchment paper.
Personal Tip: Greasing and flouring the pans helps prevent the cake from sticking and ensures clean removal.
In a large bowl, cream together the natural peanut butter, unsalted butter, granulated sugar, and brown sugar until light and fluffy. Add the eggs, one at a time, beating well after each addition. Stir in the vanilla extract.
Personal Tip: Make sure your ingredients are at room temperature for a smoother, more consistent batter.
In a separate bowl, whisk together the all-purpose flour, baking powder, baking soda, and salt. Add the dry ingredients to the peanut butter mixture in three parts, alternating with the buttermilk, beginning and ending with the flour mixture. Mix until just combined.
Personal Tip: Mix the batter gently to avoid overmixing, which can make the cake dense.
Divide the batter evenly between the prepared cake pans, smoothing the tops with a spatula. Bake for 25-30 minutes, or until a toothpick inserted into the center comes out clean. Allow the cakes to cool in the pans for 10 minutes, then turn them out onto a wire rack to cool completely.
Personal Tip: Letting the cakes cool in the pans for a few minutes helps them set before transferring to a wire rack.
Prepare the Dark Chocolate Buttercream:
In a large mixing bowl, beat the softened butter until creamy. Sift in the powdered sugar and cocoa powder, and beat until smooth and fluffy. Add the natural peanut butter, melted dark chocolate, and vanilla extract, and mix until fully incorporated.
Personal Tip: Sift the powdered sugar and cocoa powder together to avoid lumps in your frosting.
Gradually add the heavy cream, one tablespoon at a time, beating on medium-high speed until the frosting is light and fluffy. Add a pinch of salt to enhance the flavors.
Personal Tip: If the frosting becomes too soft, chill it for a few minutes before using.
Assemble the Cake:
Place one cake layer on a serving plate or cake stand. Spread a generous layer of the dark chocolate buttercream frosting over the top. Place the second cake layer on top, pressing down gently.
Personal Tip: Use a serrated knife to level the cake layers if needed for a more even assembly.
Use the remaining frosting to cover the top and sides of the cake. For a smooth finish, use an offset spatula or bench scraper. Decorate with extra dark chocolate shavings, peanut butter swirls, or chopped peanuts if desired.
Personal Tip: For a professional finish, smooth the frosting by dipping your spatula in hot water and wiping it dry before smoothing the cake.
Serve:
Allow the cake to set for at least 30 minutes before slicing. Serve at room temperature.
Personal Tip: For clean slices, dip your knife in hot water and wipe it clean between cuts.
Nutritional Information (Per Serving):
Calories: 600, Protein: 10g, Carbohydrates: 70g, Sugars: 50g, Total Fat: 30g, Saturated Fat: 15g, Fiber: 4g
Kitchen Tips, Great Ideas, How to Save Money
- Choosing the Right Peanut Butter: Natural peanut butter, with no added sugars or hydrogenated oils, gives the best flavor and texture for this cake. Make sure to stir it well before measuring to incorporate any separated oil. Processed peanut butter often contains preservatives and additives that can alter the taste and texture of your baked goods. Plus, natural peanut butter is healthier, providing a more authentic peanut flavor.
- Storing Natural Peanut Butter: Always refrigerate natural peanut butter after opening. Without preservatives, the natural oils in peanut butter can go rancid if left at room temperature. Keeping it in the fridge will help maintain its freshness and prevent spoilage.
- Using Dark Chocolate: Opt for dark chocolate with at least 70% cocoa for a rich, bittersweet flavor that contrasts beautifully with the sweet peanut butter cake. Dark chocolate is also packed with antioxidants and offers a more complex flavor profile.
- Frosting Consistency: If the buttercream is too thick, add a little more heavy cream to reach your desired consistency. If it’s too thin, you can add more powdered sugar, but be careful not to make it too sweet.
- Decorative Ideas: To make the cake even more visually appealing, consider topping it with dark chocolate shavings, crushed peanuts, or a drizzle of melted peanut butter. You can also pipe extra frosting around the edges for a professional finish.
- Storing the Cake: Store the cake covered at room temperature for up to 3 days or refrigerate for up to 5 days. Bring it back to room temperature before serving to enjoy the best texture and flavor.
- Freezing Tips: The cake layers can be baked and frozen ahead of time. Wrap them tightly in plastic wrap and store them in a freezer bag. Thaw at room temperature before assembling.
- Cost-Saving Tips: Buying chocolate in bulk or on sale can save you money. Consider making your own powdered sugar by blending granulated sugar in a high-speed blender.
- Serving Suggestions: This cake pairs wonderfully with a cold glass of milk or a cup of coffee. It’s also a great dessert to serve with a scoop of vanilla ice cream for added indulgence.
- Portion Control: This cake is rich, so consider serving smaller slices, especially if you’re serving it after a large meal. The intense flavors mean a little goes a long way!
What I Have Learned About Different Peanut Butters
There’s a big difference between natural and processed peanut butter, both in taste and how you store them. Natural peanut butter is simply ground peanuts, sometimes with a bit of salt. It’s pure, rich, and offers a true peanut flavor, but because it lacks preservatives, it needs to be refrigerated after opening to prevent the natural oils from going rancid. Processed peanut butter, on the other hand, often contains added sugars, hydrogenated oils, and preservatives to extend its shelf life and create a more spreadable consistency. While it might be more convenient, the additives can detract from the authentic taste of peanuts and are less healthy. For baking, I always choose natural peanut butter—it’s worth the extra care in storage for the superior flavor it brings to the table.