


Peanut Butter Chocolate Chip Banana Loaf – A Nutritious and Delicious Treat
Share
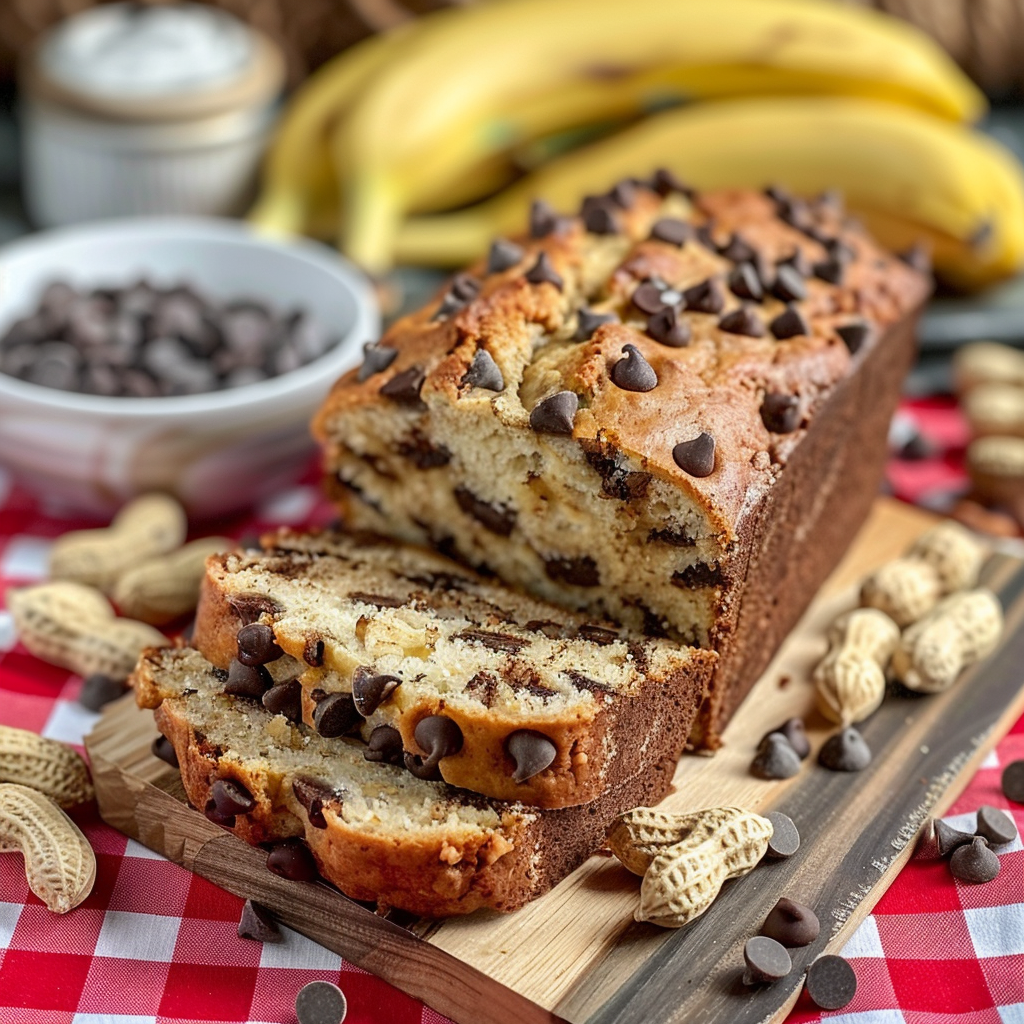
Peanut Butter Chocolate Chip Banana Loaf Is Satisfying
I like making loafs, they are so simple to assemble, the ingredients are straightforward, and the results are always rewarding. This Peanut Butter Chocolate Chip Banana Loaf, in particular, combines classic flavors in a way that’s perfect for breakfast, a snack, or even dessert. You assemble it, pop it in the oven, and befor you know it, wonderful aromas fill the kitchen It's convenient to make in advance, easy to slice, and great to serve with tea or coffee when guests stop by. Plus, it's a hit in lunchboxes—moist, flavorful, and packed with protein, thanks to the peanut butter and banana combo. It’s one of those recipes you can count on to impress without too much fuss, making it a staple in my kitchen.
Did You Know?
Bananas are not only a great source of natural sweetness but also provide essential nutrients like potassium, vitamin B6, and vitamin C. Combined with peanut butter, which offers healthy fats and protein, this loaf is both delicious and nutritious. Peanut butter and bananas have been a beloved combination for generations, often featured in sandwiches, smoothies, and desserts. Adding chocolate chips to the mix elevates this loaf to a whole new level of decadence, making it a perfect treat for any time of the day.
Yield: 10 slices
Ingredients:
Pie Crust:
1 cup mashed ripe bananas (about 2 large bananas)
1/2 cup creamy peanut butter
1/4 cup honey
1/4 cup unsalted butter, melted
2 large eggs
1 tsp vanilla extract
1 cup almond flour
1 cup all-purpose flour
1 tsp baking powder
1/2 tsp baking soda
1/2 tsp salt
1/2 cup chocolate chips
Instructions:
Preheat the Oven:
Preheat oven to 350°F (175°C). Grease a 9x5-inch loaf pan.
Personal Tip: For easy removal, line the loaf pan with parchment paper, leaving an overhang for easy lifting.
Mix the Wet Ingredients:
In a large bowl, mix mashed bananas, peanut butter, honey, melted butter, eggs, and vanilla extract until well combined.
Personal Tip: Make sure your bananas are well mashed and overripe for maximum flavor.
Mix the Dry Ingredients:
In another bowl, whisk together almond flour, all-purpose flour, baking powder, baking soda, and salt.
Personal Tip: Sift the dry ingredients to ensure even distribution and prevent lumps in the batter.
Combine Wet and Dry Ingredients:
Gradually add the dry ingredients to the wet ingredients, stirring until just combined.
Personal Tip: Be careful not to overmix—overmixing can make the loaf tough.
Fold in the Chocolate Chips:
Gently fold in the chocolate chips, distributing them evenly throughout the batter.
Personal Tip: Coat the chocolate chips in a little flour to prevent them from sinking to the bottom of the loaf.
Pour and Bake:
Pour the batter into the prepared loaf pan and smooth the top. Bake for 50-60 minutes, or until a toothpick inserted into the center comes out clean.
Personal Tip: Check the loaf at the 45-minute mark—if it's browning too quickly, cover it with foil for the remaining time.
Cool and Serve:
Let the loaf cool in the pan for 10 minutes, then transfer to a wire rack to cool completely before slicing.
Personal Tip: For the cleanest slices, wait until the loaf is fully cooled before cutting.
Nutritional Information (Per Serving):
Calories, 250; Protein, 6g; Carbohydrates, 28g; Fiber, 2g; Net Carbohydrates, 26g; Fat, 14g; Saturated Fat, 5g; Cholesterol, 45mg; Sodium, 250mg; Sugars, 15g; Glycemic Index, Medium
Kitchen Tips, Great Ideas, How to Save Money
- Choosing Budget-Friendly and Healthy Ingredients: Opt for ripe bananas that are often discounted at grocery stores—overripe bananas are perfect for baking and come at a lower price. Buy peanut butter in bulk, especially during sales, as it’s versatile for many recipes. Stock up on almond flour and chocolate chips during promotions for added savings.
- DIY Baking Essentials: If you don’t have a dedicated loaf pan, use a standard 9x5-inch pan lined with parchment paper. This saves money and reduces cleanup since parchment paper eliminates the need for greasing.
- Efficient Oven Use: Maximize energy use by baking multiple loaves at once or pairing with other oven-baked dishes. Rotating the pans ensures even baking while reducing electricity costs.
- Homemade Baking Mixes: Pre-mix dry ingredients and store them for easy baking. Not only does this save time, but it also reduces the need for single-use store-bought baking mixes, which are more expensive.
- Storage and Freshness: Store the leftover loaf in an airtight container in the refrigerator for up to 5 days. To preserve it longer, freeze individual slices—just pop them in the toaster or oven when you need a quick snack.
- Reusable Baking Essentials: Use reusable silicone baking mats or parchment paper for a more eco-friendly and economical option. This reduces waste while ensuring easy cleanup.
- Creative Garnishing: To elevate your loaf, add a sprinkle of nuts or a drizzle of honey. These small touches enhance presentation and flavor without breaking the bank.
- Educational Cooking Resources: Take advantage of free online tutorials or cooking forums to improve your baking skills. Not only do they offer budget-friendly recipe alternatives, but they also provide useful baking tips.
- Smart Ingredient Substitutions: If you’re short on almond flour or butter, try substituting with ingredients you already have, like whole wheat flour or coconut oil. These alternatives offer different nutritional benefits while keeping costs down.
- Preserving Freshness: Store your banana loaf properly to maintain its moisture and flavor. Wrapping the loaf tightly in plastic wrap before refrigerating or freezing helps retain its texture.
Let's Learn About Peanut Butter: Natural vs. Processed
When it comes to choosing between natural and processed peanut butter, understanding the differences can help you make the best decision for your health.
Natural Peanut Butter: Natural peanut butter typically contains just two ingredients: peanuts and sometimes a bit of salt. It is free from added sugars, hydrogenated oils, or preservatives. Because of its simplicity, natural peanut butter separates over time, with the oil rising to the top. This is a sign of its purity. You’ll need to stir it before use, but its rich, peanut-forward flavor makes it worth the effort. It’s the healthier option as it provides essential nutrients like healthy fats, protein, and vitamins with no unnecessary additives.
Processed Peanut Butter: Processed peanut butter, on the other hand, often contains additional ingredients such as sugars, hydrogenated oils (to prevent separation), and other stabilizers. While it has a smoother, sweeter taste and is more convenient (no need to stir), it tends to have a higher amount of unhealthy fats and added sugars. Hydrogenated oils, in particular, can lead to the inclusion of trans fats, which have been linked to negative health effects, such as heart disease.
Which is Better? Natural peanut butter is generally the healthier choice due to its simple ingredients and lack of added sugars and unhealthy fats. Processed peanut butter may be more convenient but comes at the cost of added ingredients that aren’t necessary for a nutritious diet. If you're looking for a cleaner, healthier option, go with natural peanut butter to reap all the nutritional benefits without the drawbacks of processed versions.