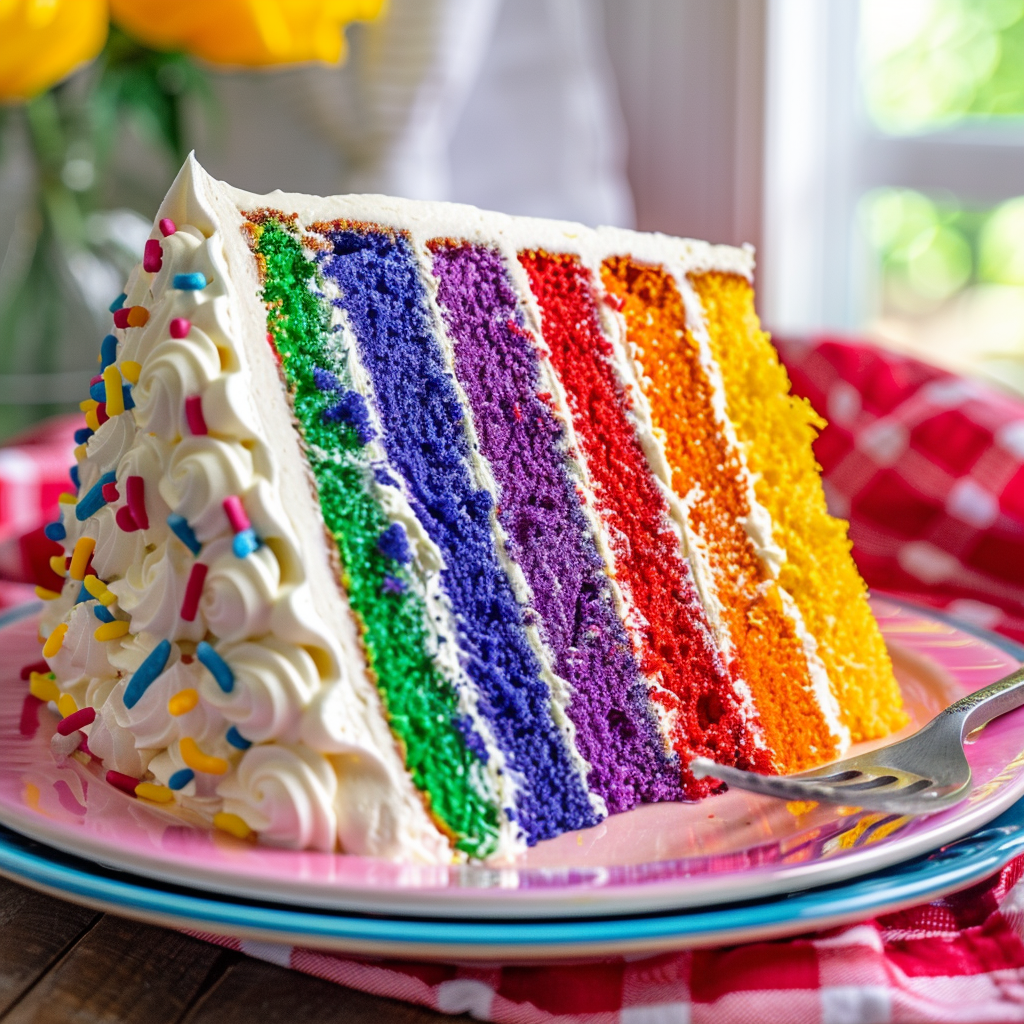
Naturally Colored 6-Layer Rainbow Cake – A Showstopper with Plant-Based Food Coloring

Share
Celebrate With a Vibrant 6-Layer Rainbow Cake
You’ve probably seen this eye-catching cake on social media—it’s a showstopper for any celebration! What makes this recipe stand out is that it uses homemade cake layers and natural food colorings instead of artificial dyes, making it a winner in our kitchen. Not only does it look stunning, but it’s also made with ingredients you can feel good about. Let’s dive into this impressive cake that’s perfect for birthdays, anniversaries, or any special occasion where you want to wow your guests.
Did You Know? Natural Food Coloring Options:
Yes, you can buy natural food colorings in health food stores that are free from synthetic chemicals and artificial dyes. These natural colorings are typically made from plant-based ingredients like vegetables, fruits, and spices. Some popular brands include Supernatural, ColorKitchen, and India Tree, which offer vibrant, naturally colored sprinkles and food dyes that are non-GMO, gluten-free, and preservative-free.
Labels: Look for terms like "plant-based," "natural," "organic," "non-GMO," and "no artificial dyes or preservatives."
Ingredients: The ingredients should list plant-based sources like beet juice, turmeric, spirulina, or carrot powder.
Certifications: Look for USDA Organic or non-GMO certifications to ensure the products are free of chemicals.
Yield:
12 servings (12 slices from an 8-inch, 6-layer cake)
Ingredients:
For the Cake:
- 3 cups all-purpose flour
- 1 tablespoon baking powder
- 1/2 teaspoon salt
- 1 1/2 cups unsalted butter, softened
- 2 cups granulated sugar
- 4 large eggs
- 1 tablespoon vanilla extract
- 1 1/2 cups whole milk
- Natural food colorings (from the options above)
- Natural sprinkles (optional, for decorating)
For the Buttercream Frosting:
- 1 1/2 cups unsalted butter, softened to room temperature
- 6 cups powdered sugar
- 2 teaspoons vanilla extract
- 1/4 cup heavy cream or milk
Instructions:
Preheat the Oven:
Preheat your oven to 350°F (175°C). Grease and line six 8-inch round cake pans with parchment paper.
Personal Tip: If you don’t have six pans, bake the layers in batches, and let the baked layers cool on a wire rack.
Prepare the Cake Batter:
Mix Dry Ingredients:
In a medium bowl, sift together the flour, baking powder, and salt.
Personal Tip: Sifting helps aerate the flour, making the cake lighter in texture.
Cream Butter and Sugar:
In a large bowl, beat the softened butter and sugar together until light and fluffy.
Personal Tip: Creaming the butter and sugar properly ensures the cake will be light and airy. Take your time with this step.
Add Eggs and Vanilla:
Add the eggs one at a time, beating well after each addition. Stir in the vanilla extract.
Personal Tip: Make sure your eggs are at room temperature to help them blend smoothly into the batter.
Alternate Wet and Dry Ingredients:
Gradually add the dry ingredients to the wet ingredients, alternating with the milk. Mix until just combined.
Personal Tip: Don’t overmix! Overmixing can make the cake dense, so stir just until combined.
Color the Batter:
Divide the batter evenly into six bowls (approximately 1 cup of batter per bowl). Add your ready-made natural food color powders to each bowl, adjusting the amount based on the depth of color you want.
Personal Tip: Pre-mixing the powders with a small amount of water or milk helps them blend more evenly into the batter.
Bake the Layers:
Pour each colored batter into the prepared cake pans and spread evenly. Bake for 18-20 minutes, or until a toothpick inserted into the center comes out clean.
Personal Tip: Rotate the pans halfway through baking to ensure even cooking, especially if your oven has hot spots.
Cool the Cakes:
Let the cakes cool in the pans for 10 minutes, then transfer them to a wire rack to cool completely.
Personal Tip: Ensure the layers are fully cooled before frosting, or the frosting will melt and slide off.
Prepare the Buttercream Frosting:
Beat the Butter:
In a large mixing bowl, beat the softened butter until creamy.
Personal Tip: Beat the butter for at least 3-4 minutes to get a fluffy, smooth texture.
Add Powdered Sugar and Vanilla:
Gradually add the powdered sugar, one cup at a time, beating well after each addition. Add the vanilla extract.
Personal Tip: Sift the powdered sugar before adding it to avoid lumps in the frosting.
Add Heavy Cream or Milk:
Slowly add the heavy cream (or milk) and beat until the frosting is light and fluffy. If the frosting is too thick, add more cream or milk, one tablespoon at a time.
Personal Tip: If the frosting is too runny, chill it for a few minutes to firm it up before using.
Assemble the Cake:
Layer the Cake:
Place your first colored cake layer on a serving plate and spread a thin layer of frosting on top. Repeat with the remaining colored layers.
Personal Tip: Use a serrated knife to level the top of each cake layer if necessary for even stacking.
Frost the Cake:
Spread the remaining frosting over the top and sides of the cake.
Personal Tip: Apply a crumb coat (a thin layer of frosting) first, chill the cake for 30 minutes, then apply the final layer of frosting for a smooth finish.
Decorate the Cake:
For a finishing touch, pipe decorative swirls or rosettes on the top layer and add natural sprinkles if desired.
Personal Tip: If you don’t have a piping bag, a plastic bag with a small corner cut off works as a great substitute.
Nutritional Information (Per Serving): 12 servings
Calories: 500 | Protein: 4g | Carbohydrates: 70g | Fiber: 1g | Net Carbohydrates: 69g | Fat: 22g | Saturated Fat: 13g | Cholesterol: 100mg | Sodium: 220mg | Sugars: 55g | Glycemic Index: Medium
Kitchen Tips, Great Ideas, How to Save Money
-
Bulk Buying:
Purchase flour, sugar, and butter in bulk to save money. These ingredients are pantry staples with long shelf lives, and stocking up during sales helps maximize savings. -
Use Natural Food Colorings:
To make this recipe easier, use pre-made natural food colorings from brands like Supernatural or ColorKitchen. These powders last a long time and can be used for multiple recipes. -
Room Temperature Ingredients for Best Results:
Make sure all your ingredients, especially butter, eggs, and milk, are at room temperature before you begin baking. Room temperature ingredients mix more evenly, resulting in a smoother batter and lighter, fluffier cake layers. -
Reusable Baking Tools:
Invest in reusable cake pans, silicone mats, and piping bags. These eco-friendly tools save money over time, reduce waste, and are easier to clean than disposable options. -
Smart Storage:
Store leftover cake in an airtight container in the refrigerator for up to five days. Allow the cake to sit at room temperature for 30 minutes before serving to soften the frosting. -
Flavor Variations:
Add flavor twists by incorporating almond extract or lemon zest into the frosting or batter. This small change enhances the overall taste of the cake. -
Frosting Consistency:
If your buttercream is too thick, thin it out with a bit of milk or heavy cream. If it's too runny, add more powdered sugar until the frosting reaches the desired consistency. -
Creative Presentation:
Decorate your cake with natural sprinkles or edible flowers for an elegant touch. These natural additions enhance the look without adding artificial ingredients. -
Freeze Leftover Frosting:
If you have extra frosting, freeze it in an airtight container for up to a month. Thaw in the fridge and re-whip when you’re ready to use it. -
Repurpose Leftovers:
Turn leftover cake or frosting into cake pops or truffles. Crumble the cake, mix with frosting, shape into balls, and dip in melted chocolate for a fun treat.
Can You Get Cake Sprinkles That Do Not Have Any Artificial Ingredients?
Yes, there are many natural sprinkles available that are free from artificial ingredients. These sprinkles use plant-based dyes from sources like beets, spirulina, and turmeric to achieve their colors, without synthetic chemicals or preservatives. Popular brands like Supernatural, ColorKitchen, and India Tree offer vibrant, naturally colored sprinkles that can be found in health food stores and online.
Natural sprinkles are often gluten-free, non-GMO, and allergen-friendly, making them a healthier choice for decorating baked goods. They provide a great alternative to artificial options and ensure that your cake not only looks great but is also free from unnecessary additives.


