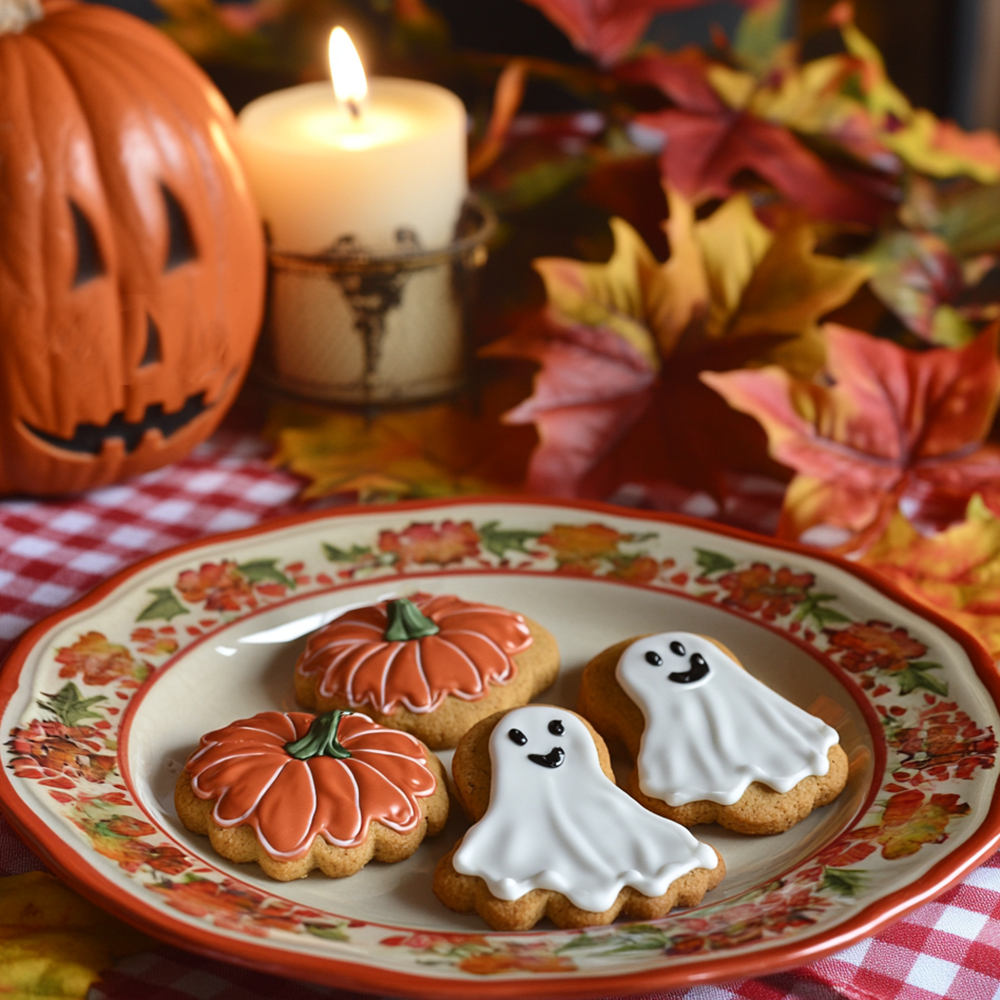
Gingersnap Cookie Cutter Halloween Cookies

Share
These crisp, warmly spiced gingersnap cookies are perfect for rolling out and cutting into fun Halloween shapes like pumpkins, and ghosts. With flavors of molasses, ginger, and cinnamon, they make an ideal fall treat, delicious for decorating or enjoying plain.
Did You Know?
Gingersnaps originated as a holiday treat, spiced to warm the palate with flavors like ginger, cinnamon, and cloves. Molasses not only adds sweetness but also gives the cookies a slightly chewy center, making these cookies a sturdy, classic choice for Halloween decorating.
Yield:
24-30 cookies (depending on cutter size)
Ingredients:
For the Cookies:
2 1/2 cups all-purpose flour
1/2 teaspoon baking soda
1/4 teaspoon baking powder
1/2 teaspoon salt
1 tablespoon ground ginger
1 1/2 teaspoons ground cinnamon
1/4 teaspoon ground cloves
1/4 teaspoon ground nutmeg
1/2 cup unsalted butter, at room temperature
1/2 cup granulated sugar
1/2 cup packed brown sugar
1/4 cup molasses, at room temperature
1 large egg, at room temperature
1 teaspoon pure vanilla extract
Instructions:
-
Prepare the Dry Ingredients:
In a medium bowl, whisk together flour, baking soda, baking powder, salt, ginger, cinnamon, cloves, and nutmeg until well combined.
Personal Tip: Sifting these dry ingredients together evenly distributes the spices for a consistent flavor. -
Cream the Butter and Sugars:
In a large mixing bowl, beat the butter, granulated sugar, and brown sugar until light and fluffy, about 2-3 minutes. Add molasses, egg, and vanilla extract, beating until smooth.
Personal Tip: Creaming the butter and sugars thoroughly creates a smoother, well-blended dough. -
Combine Wet and Dry Ingredients:
Gradually add the dry ingredients to the wet mixture, mixing until a smooth dough forms. If the dough is too sticky, add a tablespoon of flour at a time until rollable.
Personal Tip: Chill the dough if needed to make it easier to handle. -
Chill the Dough:
Divide the dough in half, shape each half into a disc, wrap in plastic wrap, and chill in the refrigerator for at least 1 hour.
Personal Tip: Chilling keeps the dough firm, preventing spreading during baking. -
Roll Out and Cut Shapes:
Preheat oven to 350°F (175°C) and line baking sheets with parchment paper. On a lightly floured surface, roll one disc of dough to about 1/4 inch thick. Use Halloween-shaped cookie cutters to cut out shapes, placing them about 1 inch apart on baking sheets. -
Bake the Cookies:
Bake for 8-10 minutes, until the edges turn golden brown. Allow cookies to cool on the baking sheet for 5 minutes before transferring to a wire rack to cool completely.
A Little More Information About These Gingersnap Roll-Out Cookies
Texture: These cookies have crisp edges and a slightly chewy center, giving a satisfying snap without being too hard. The molasses keeps the center soft and flavorful.
Flavor Profile: The warm blend of ginger, cinnamon, and cloves creates a classic gingersnap flavor, perfect for fall and Halloween.
Tips for Success
- Perfect Cut-Outs: Chilling the dough ensures it holds shape and allows for clean cuts with the cookie cutters.
- Extra Sparkle: Sprinkle sugar over cookies before baking for a textured, sparkling finish.
- Storage: Store in an airtight container at room temperature for up to a week; these cookies stay crisp, making them perfect for gifting.
- Decorate with Icing: Once cooled, use royal icing or glaze to add faces or decorations to the Halloween shapes.
These Gingersnap Roll-Out Cookies are a Halloween favorite, combining the spice of gingersnaps with the fun of shaped cookies. Decorate with icing or enjoy them plain for a delightfully spiced treat!
Royal Icing for Halloween Cookie Decorating
Ingredients:
1 cup powdered sugar
1 tablespoon meringue powder
2–3 tablespoons water or milk (adjust for consistency)
1/2 teaspoon vanilla extract
Natural food coloring
Decorating Instructions:
-
Prepare the Icing:
In a small bowl, whisk together powdered sugar, milk, and vanilla extract until smooth. Adjust the milk to reach a thick but spreadable consistency, adding just a few drops of milk at a time if needed.
Personal Tip: For easy piping, make sure the icing is thick enough to hold its shape but thin enough to flow smoothly. -
Adjust Icing for Glazing (Flooding):
To create a smooth, glazed look on your cookies, add a few extra drops of milk to thin the icing further until it reaches a syrup-like consistency. When you lift a spoonful of icing and drizzle it back into the bowl, it should smooth out within 5–10 seconds. This thinner icing will spread smoothly over the cookie. -
Outline the Cookie:
Using a piping bag filled with thicker royal icing, outline the edges of each cookie. Let this outline set for about 5 minutes; it will act as a barrier to keep the glaze contained. -
Flood the Center of the Cookie:
Use the thinner, glaze-consistency icing to fill in (or “flood”) the center of the cookie. Spoon or pipe the glaze into the outlined area, using a toothpick to spread the icing and fill any small gaps. Gently tap the cookie to level out the icing and remove any air bubbles. Allow the glaze to set completely before adding any additional decorations. -
Color and Pipe Details:
Divide the remaining icing into portions if using multiple colors. Add a drop or two of different natural food colorings to each portion to create a variety of colors. Transfer each color to piping bags or zip-top bags with a small corner snipped off for detailed designs. -
Using Icing Gels for Easy Decorating:
For precise Halloween details like eyes, whiskers, and outlines, use small tubes of pre-colored icing gel, which are convenient for fine details without extra mixing or tools. These icing gels are available in various colors at grocery stores, craft stores like Michaels, and baking sections. Brands like Wilton and Betty Crocker offer tubes that are ready to use, saving time and simplifying the decoration process.
Personal Tip: Practice your designs on parchment paper to get comfortable with piping before decorating your cookies directly.
Nutritional Information (Per Cookie): 12 Cookies
Calories, 220 | Protein, 3g | Carbohydrates, 23g | Fiber, 1g | Net Carbohydrates, 22g | Fat, 14g | Saturated Fat, 7g | Cholesterol, 30mg | Sodium, 80mg | Sugars, 14g | Glycemic Index, Medium


