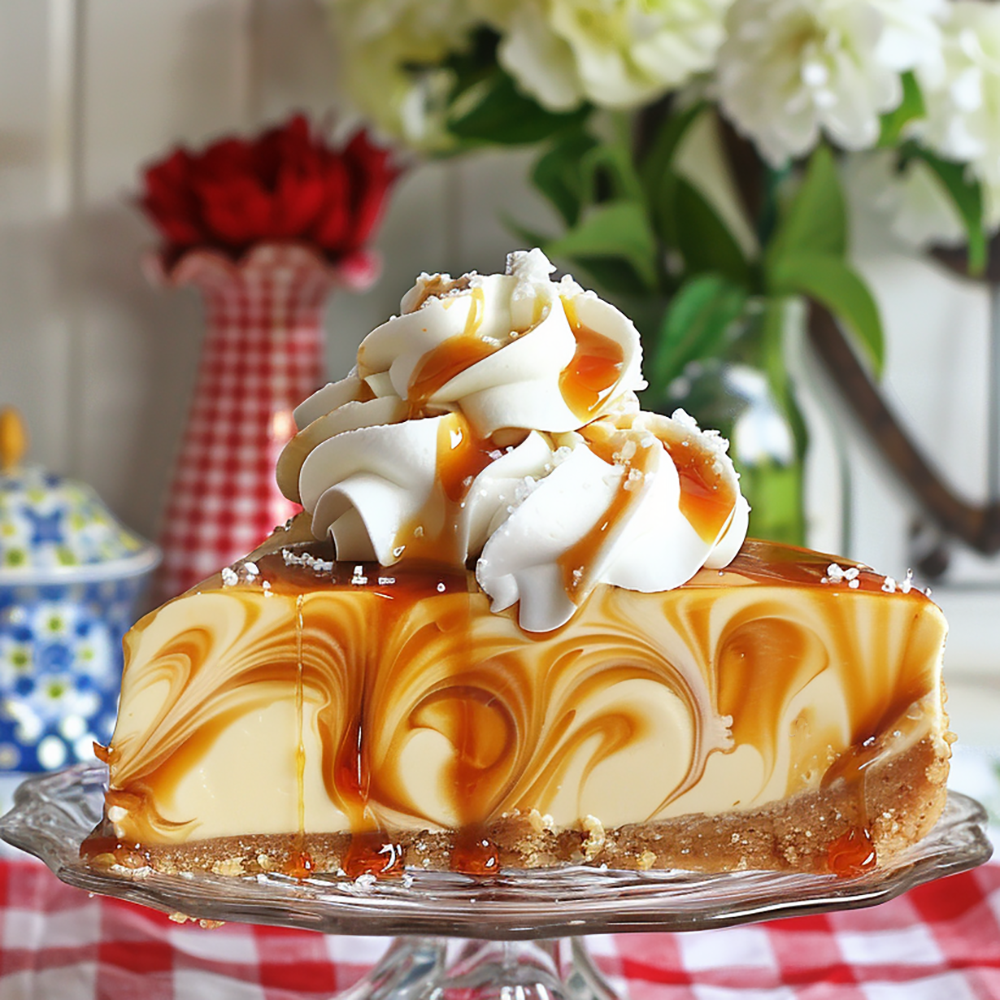
Decadent No-Bake Salted Caramel Cheesecake with Homemade Caramel Swirls

Share
A Delicious No-Bake Salted Caramel Cheesecake A Delightful Treat
Cheesecakes are often the star of any dessert spread, especially when they come with stunning swirls. That irresistible combination of creamy cheesecake filling with rich, salted caramel always makes it feel like a dessert made for special occasions. And the best part? This recipe is no-bake, so it’s much easier than it looks! I remember the first time I tried a salted caramel cheesecake—it was love at first bite! The balance of sweet and salty, paired with the smooth, creamy texture, made it unforgettable. I wanted to recreate that magic at home, and once I realized how simple it was to make my own caramel sauce, it became a favorite. Now, this is my go-to dessert when I want to impress. It’s perfect for any gathering where you want to leave people amazed—trust me, it works every time!
Did You Know?
Salted caramel is a relatively modern dessert addition, popularized by French pastry chef Henri Le Roux in Brittany. The combination of salt and caramel may seem unusual, but salt enhances the natural sweetness of caramel, creating an unforgettable balance of flavors. This method has transformed desserts globally, making salted caramel a staple in ice creams, cakes, and pastries everywhere.
Yield:
8 servings
Ingredients:
For the Graham Wafer Crust:
1 ½ cups graham cracker crumbs
¼ cup granulated sugar
½ cup unsalted butter, melted
For the Cheesecake Filling:
3 (8 oz) packages cream cheese, softened
1 cup powdered sugar
1 cup heavy whipping cream
1 tsp vanilla extract
For the Salted Caramel Sauce:
1 cup granulated sugar
6 tbsp unsalted butter, cut into pieces
½ cup heavy cream
1 tsp sea salt
For the Whipped Cream Topping:
1 cup heavy whipping cream
2 tbsp powdered sugar
½ tsp vanilla extract
Instructions:
Prepare the Crust:
-
Mix the Crust Ingredients:
Combine graham cracker crumbs, sugar, and melted butter in a bowl.
Personal Tip: Press the crust mixture firmly into the bottom of your springform pan. The tighter you pack it, the more stable your cheesecake base will be. -
Chill the Crust:
Place the crust in the refrigerator to firm up while you prepare the filling.
Personal Tip: Letting the crust chill for at least 30 minutes ensures it holds up against the rich filling.
Make the Caramel Sauce:
-
Melt the Sugar:
In a medium saucepan, melt the sugar over medium heat, stirring continuously until it turns golden brown.
Personal Tip: Watch closely—caramel can burn in seconds! Stir constantly, but gently. -
Add Butter and Cream:
Stir in the butter until melted, then slowly add the cream.
Personal Tip: Be cautious when adding cream to hot caramel; it will bubble up quickly. Stir continuously to prevent spills. -
Add Salt:
Stir in the sea salt and let the caramel simmer for 1-2 minutes. Remove from heat and let cool.
Personal Tip: If the caramel seems lumpy, stir it until smooth as it cools down—it will eventually melt into a silky consistency.
Prepare the Filling:
-
Beat Cream Cheese and Sugar:
In a large bowl, beat the cream cheese with powdered sugar until creamy and smooth.
Personal Tip: Make sure the cream cheese is at room temperature to avoid lumps. If it’s too cold, let it sit for 20-30 minutes before mixing. -
Whip Heavy Cream:
In another bowl, whip heavy cream and vanilla until stiff peaks form, then gently fold into the cream cheese mixture.
Personal Tip: Take care not to over-whip the cream—stop as soon as stiff peaks form to keep the filling light and airy. -
Add Caramel Swirls:
Pour half of the cooled caramel sauce into the filling and swirl with a spatula.
Personal Tip: For beautiful caramel swirls, don’t over-mix! Gently fold the caramel into the cheesecake for visible streaks. -
Chill the Cheesecake:
Spread the cheesecake filling over the crust and refrigerate for at least 4 hours, or overnight.
Personal Tip: For best results, refrigerate the cheesecake overnight to allow the flavors to fully develop.
Make the Whipped Cream Topping:
-
Whip the Cream:
Whip heavy cream, powdered sugar, and vanilla until stiff peaks form.
Personal Tip: Chill your mixing bowl and beaters beforehand for faster whipping.
Assemble and Serve:
-
Drizzle Caramel and Pipe Whipped Cream:
Once the cheesecake is set, drizzle the remaining caramel sauce on top and pipe whipped cream around the edges.
Personal Tip: For a gourmet touch, sprinkle sea salt flakes over the caramel for that extra salty-sweet kick.
Nutritional Information (Per Serving):
Calories: 510 | Protein: 5g | Carbohydrates: 42g | Fiber: 1g | Net Carbohydrates: 41g | Fat: 38g | Saturated Fat: 23g | Cholesterol: 135mg | Sodium: 320mg | Sugars: 32g | Glycemic Index: Medium
Kitchen Tips, Great Ideas, How to Save Money
-
Perfect Crust Consistency:
Use a food processor to finely crush graham crackers. If you don’t have one, place the crackers in a plastic bag and crush them with a rolling pin for evenly ground crumbs. -
Caramel Patience:
When making caramel, keep stirring and don’t rush. Use a heavy-bottomed pan for even heat distribution to avoid crystallization or burning. -
Soft Cream Cheese Tip:
For lump-free cheesecake filling, ensure the cream cheese is fully softened before mixing. If needed, microwave it in 10-second intervals until it reaches room temperature. -
Whipped Cream Stability:
To ensure your whipped cream holds its shape, chill both your mixing bowl and beaters before you start whipping. This helps the cream whip faster and stay firm. -
Storing Caramel:
Leftover caramel sauce can be stored in a sealed container in the fridge for up to two weeks. Just reheat it gently before using. -
Cheesecake Swirls:
For visually appealing caramel swirls, fold the caramel into the filling gently—over-mixing will blend the caramel into the cheesecake and lose the swirl effect. -
Alternative Sweeteners:
For a different flavor profile, experiment with honey or maple syrup instead of sugar when making your caramel sauce. These natural sweeteners add depth and a subtle complexity. -
Caramel Shortcut:
If you’re short on time, you can use store-bought caramel sauce. Look for high-quality brands made with natural ingredients to maintain the cheesecake’s gourmet feel. -
Garnish Creativity:
For an extra crunch, sprinkle toasted nuts like pecans or almonds over the top before serving. These will complement the sweet and salty flavors. -
Cost-Saving Bulk Buys:
Buy cream cheese and heavy cream in bulk when they’re on sale. Both freeze well, allowing you to use them in future recipes without waste.
Let's Learn About Different Types of Salts
Salt is more than just a simple seasoning—its origin and processing significantly affect its flavor and how it interacts with dishes. Here’s a deeper look into how different types of salt are sourced and used:
Sea Salt:
Derived from the evaporation of seawater, sea salt is minimally processed, which allows it to retain trace minerals such as magnesium, calcium, and potassium. These minerals add subtle flavor and color variations. Sea salt is harvested from various coastal regions around the world. Its coarse texture makes it a great finishing salt for both sweet and savory dishes.
Kosher Salt:
Named after its use in the koshering process of drawing blood from meat, kosher salt has large, irregular crystals that dissolve easily, making it ideal for seasoning during cooking. It’s mined from underground salt deposits. Its clean, straightforward taste without added iodine makes it a favorite among chefs for everyday cooking.
Himalayan Pink Salt:
Mined from ancient sea salt deposits in the foothills of the Himalayas, this pink salt gets its signature color from iron oxide (rust) and contains trace minerals like calcium, potassium, and magnesium. It’s often used in cooking and as a decorative finishing salt due to its visual appeal. Himalayan salt blocks are even used for grilling or serving food, imparting a mild salty flavor to dishes.
Fleur de Sel:
This delicate, flaky salt is hand-harvested from sea salt flats in places like Brittany, France. It forms only under specific weather conditions when thin salt crystals float on the surface of the water and are skimmed off by hand. Fleur de Sel is prized for its texture and flavor and is often used as a finishing salt on gourmet dishes and desserts.
Smoked Salt:
Created by smoking salt over wood fires, smoked salt takes on a deep, rich flavor from the type of wood used—commonly oak, hickory, or alder. It’s a fantastic way to add a smoky dimension to grilled or roasted meats, vegetables, or even sweet dishes like caramel or chocolate.
Salt comes in different forms and flavors, each contributing uniquely to the food it seasons, whether it's enhancing everyday dishes or adding a gourmet touch.


