


Classic Crème Brûlée Recipe: A Light Delight for Your Dessert
Share
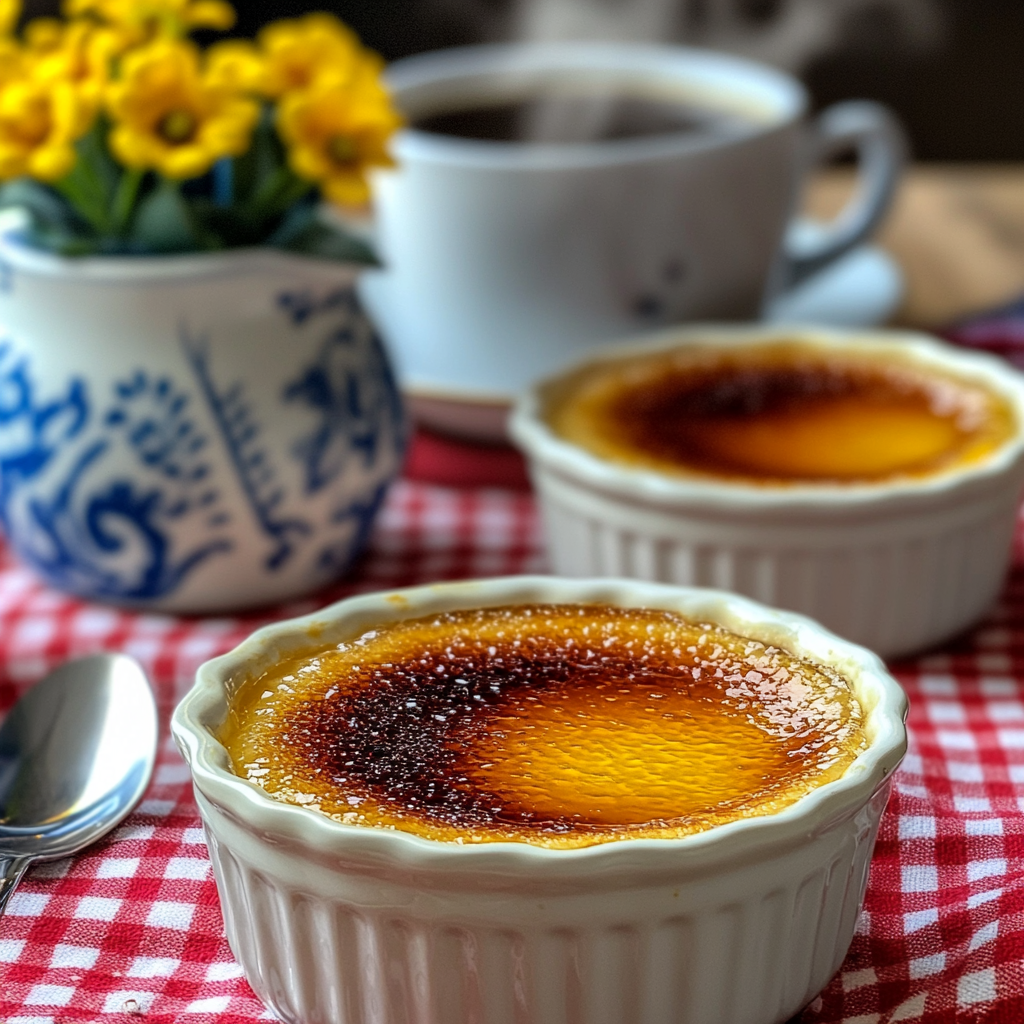
Discovering Crème Brûlée in Paris
During a foodie adventure with my daughter in Paris, we found ourselves at a quaint café, where the Crème Brûlée was unforgettable. Its crisp caramelized top and creamy custard made for the perfect indulgence. After tasting that first bite, I knew I had to recreate the experience at home. Now, every time I make this dessert, it transports me back to that charming café. Crème Brûlée is simple yet elegant and never fails to impress, whether you’re serving it at a family gathering or a special dinner.
Did You Know?
Crème Brûlée, known for its rich custard base and contrasting caramelized sugar top, can be easily adapted for those with dietary restrictions. You can replace traditional heavy cream with non-dairy alternatives like coconut or almond milk, maintaining the creamy texture without sacrificing flavor. The caramelized sugar top offers a delightful crunch, creating a beautiful contrast with the smooth custard beneath.
Yield: 6 servings
Ingredients:
For Dairy Version:
2 cups heavy cream
1 vanilla bean (or 1 tsp vanilla extract)
5 large egg yolks
1/2 cup granulated sugar
Additional sugar for caramelizing
For Non-Dairy Version:
2 cups full-fat coconut milk or almond milk
1 vanilla bean (or 1 tsp vanilla extract)
5 large egg yolks
1/2 cup granulated sugar
Additional sugar for caramelizing
Instructions:
Prepare the Custard:
Preheat your oven to 325°F (160°C) and place six 6-ounce ramekins in a baking dish.
Personal Tip: Using fresh vanilla beans enhances flavor more than extract.
Heat the Milk:
In a saucepan, heat the heavy cream or non-dairy milk with the vanilla bean (split, seeds scraped) over medium heat until it just begins to simmer. Remove from heat and let sit for a few minutes.
Personal Tip: Whisk the egg yolks and sugar until pale for a smooth, velvety texture.
Mix Egg Yolks and Sugar:
Whisk together the egg yolks and granulated sugar until thick.
Temper the Eggs:
Slowly whisk the hot cream/milk mixture into the egg yolks to prevent curdling.
Strain the Mixture:
Strain the mixture through a fine-mesh sieve to remove lumps and vanilla pods.
Bake the Custard:
Divide the custard evenly among the ramekins. Pour hot water into the baking dish halfway up the sides of the ramekins. Bake for 40-45 minutes, until the custard is set but still slightly jiggly in the center.
Cool:
Let the custards cool at room temperature, then refrigerate for at least 2 hours.
Caramelize the Sugar:
Before serving, sprinkle an even layer of sugar on top and caramelize with a kitchen torch.
Personal Tip: Keep the torch moving to avoid burning.
Serve:
Let the caramelized sugar harden for a minute before serving to achieve the perfect crack when you dig in.
Nutritional Information (Per Serving):
Calories: 250, Fat: 20g, Saturated Fat: 12g, Carbohydrates: 18g, Fiber: 0g, Sugars: 17g, Protein: 4g
Kitchen Tips, Great Ideas, How to Save Money
1. Bulk Buying: Stock up on staple ingredients like vanilla beans, sugar, and eggs in larger quantities. Vanilla beans, though a bit pricey, can be bought in bulk for better value, and sugar and eggs have long shelf lives. Buying in bulk can significantly cut costs, especially if you bake frequently.
2. DIY Non-Dairy Milk: If you choose to make the non-dairy version, consider making your own almond or coconut milk at home. It’s cheaper and gives you control over the ingredients, allowing you to skip any added preservatives or sugars that store-bought versions may contain.
3. Reusable Baking Tools: Investing in quality ramekins and a kitchen torch is a smart move. These tools will last for years and can be used for a variety of other desserts. Plus, using durable, reusable tools reduces the need for disposable baking items, saving you money over time.
4. Energy Efficiency: Double up on your efforts by baking multiple desserts at once. Crème Brûlée can easily be made in larger batches. Store the extra servings in the fridge and enjoy them over several days—an energy-efficient way to prepare a quick dessert.
5. Smart Storage: If you have leftovers, keep them fresh by storing them in an airtight container in the fridge. Crème Brûlée can be stored for up to 3-4 days and tastes just as delicious when served cold. This tip ensures no food goes to waste while still keeping that restaurant-quality taste.
6. Ingredient Substitutions: Out of heavy cream? Use half-and-half or a combination of milk and cream as a substitute. If you prefer a lighter version, non-dairy alternatives like coconut milk can easily take its place without sacrificing texture.
7. Flavor Enhancements: Get creative by adding flavors like a pinch of cinnamon or nutmeg to the custard. For a special twist, try infusing the cream with orange zest or a splash of coffee liqueur for a unique take on this classic dessert.
8. DIY Toppings: Fresh berries, a dusting of powdered sugar, or a drizzle of fruit sauce can add a burst of freshness to your Crème Brûlée. These additions also bring extra color and flavor to each serving, giving your guests something a little extra to enjoy.
9. Learning and Sharing: Engage with online baking communities or recipe groups where you can share your experiences making Crème Brûlée and learn from others. By sharing tips and techniques, you can enhance your skills and discover new ways to enjoy this dessert.
10. Creative Presentations: For an elevated dining experience, serve Crème Brûlée in decorative ramekins or dishes. Garnishing with a sprig of mint or edible flowers can create a stunning visual appeal, perfect for special occasions.
Let’s Learn About Torching The Crème Brûlée
The final touch to any Crème Brûlée is the perfectly caramelized sugar topping. To achieve this, you’ll need a kitchen torch. This handy tool ensures even heat distribution, quickly melting the sugar into a hard, glassy top. Keep the torch moving in small circles to avoid burning any one spot. If you don’t have a torch, you can use the broiler in your oven, but be careful as this method is less precise and can burn the sugar quickly. The key to a great caramelization is an even layer of sugar and steady, controlled heat. Once you’ve achieved that golden crackle, let it sit for a minute to harden before breaking through it with your spoon!