


Authentic Black Forest Cake - A Showstopper for Special Occasions
Share
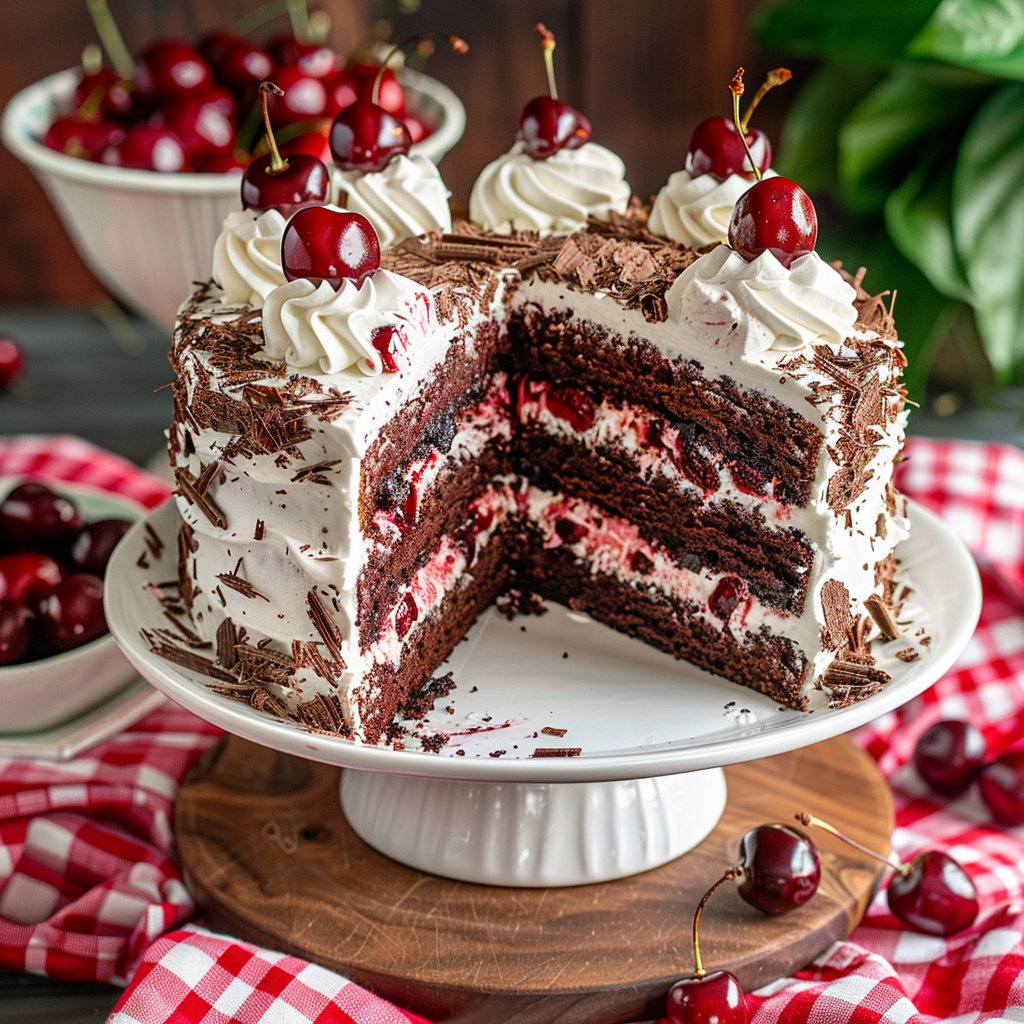
Black Forest Cakes Take Center Stage
Authentic Black Forest Cake - A Showstopper for Special Occasions
"Rich chocolate, luscious cherries, and fluffy whipped cream – the ultimate celebration cake!"
Yield:
16 servings
Ingredients:
Chocolate Cake:
- 2 1/2 cups all-purpose flour
- 2 teaspoons baking powder
- 2 teaspoons baking soda
- 1 cup unsweetened cocoa powder
- 2 1/4 cups granulated sugar
- 1 1/2 teaspoons salt
- 3 large eggs
- 1 1/2 cups whole milk
- 3/4 cup vegetable oil
- 1 tablespoon vanilla extract
- 1 1/2 cups boiling water
Cherry Filling:
- 3 cups fresh or frozen cherries, pitted
- 1/2 cup granulated sugar
- 3 tablespoons cornstarch
- 1/3 cup water
- 1 1/2 tablespoons lemon juice
- 3 tablespoons kirschwasser (optional)
Whipped Cream:
- 3 cups heavy whipping cream
- 1/2 cup powdered sugar
- 1 1/2 teaspoons vanilla extract
Toppings:
- Dark chocolate shavings or curls
- Fresh cherries for garnish
Instructions:
Prepare the Cake Layers:
- Preheat oven to 350°F (175°C). Grease and flour three 9-inch round cake pans.
- Sift together flour, baking powder, baking soda, cocoa powder, sugar, and salt in a large bowl.
- Add eggs, milk, oil, and vanilla. Mix until smooth. Stir in boiling water (batter will be thin).
- Divide batter evenly among the three pans and bake for 25–30 minutes, or until a toothpick inserted in the center comes out clean.
- Cool cakes in pans for 10 minutes, then transfer to wire racks to cool completely.
Prepare the Cherry Filling:
- Combine cherries, sugar, cornstarch, water, and lemon juice in a medium saucepan. Cook over medium heat, stirring until thickened and bubbling.
- Boil for 1 minute, then remove from heat. Stir in kirschwasser (optional) and cool completely.
Prepare the Whipped Cream:
- In a chilled bowl, whip heavy cream until soft peaks form. Add powdered sugar and vanilla, then whip until stiff peaks form.
Assemble the Cake:
- Place one cake layer on a serving plate. Spread 1/3 of the cherry filling and a layer of whipped cream over the top.
- Repeat with the second layer, cherry filling, and whipped cream.
- Add the third layer, spreading remaining cherry filling and whipped cream over the top and sides.
Garnish:
- Sprinkle chocolate shavings or curls over the cake and garnish with fresh cherries.
Nutritional Information (Per Serving):
Calories, 520 | Protein, 7g | Carbohydrates, 75g | Fiber, 4g | Net Carbohydrates, 71g | Fat, 25g | Saturated Fat, 15g | Cholesterol, 95mg | Sodium, 400mg | Sugars, 55g | Glycemic Index, Medium
Kitchen Tips, Great Ideas, How to Save Money
-
Using Fresh vs. Frozen Cherries: Fresh cherries offer the best flavor when in season, while frozen cherries are more convenient and available year-round. Opt for frozen cherries to save time on pitting and ensure a consistent flavor.
-
Sweetness Adjustment: Adjust the sweetness of the cherry filling to your liking by tasting it as it cooks. Add more sugar if needed to balance the tartness of the cherries.
-
Kirschwasser Substitution: If you don't have kirschwasser, use a cherry liqueur or even omit the alcohol for a kid-friendly version. A little almond extract can also add a unique twist.
-
Whipped Cream Stability: To stabilize the whipped cream, add a tablespoon of cornstarch or a package of unflavored gelatin dissolved in a little water. This helps the whipped cream hold its shape longer.
-
Chocolate Shavings: Use a vegetable peeler to shave chocolate from a bar for beautiful chocolate curls. Chill the chocolate bar in the fridge for easier shaving, and handle it minimally to avoid melting.
-
Storage Tips: Store any leftover cake in an airtight container in the refrigerator for up to 3 days. Bring to room temperature before serving to enjoy the best texture and flavor.
-
Serving Suggestions: Serve the cake with a scoop of vanilla ice cream or a dollop of whipped cream for an extra indulgent treat. Pair it with a cup of hot coffee or a glass of milk.
-
Health Benefits: Cherries are rich in antioxidants and vitamins, making this dessert not only delicious but also nutritious. They support immune health and provide essential nutrients like vitamin C and potassium.
-
Garnish Ideas: In addition to cherries and chocolate shavings, consider garnishing with a dusting of powdered sugar or a few mint leaves for a burst of color. Edible flowers can also add a beautiful, decorative touch.
-
Cost-Saving Tips: Buy cherries in bulk when they are in season and freeze any excess. This reduces waste and saves money, ensuring you always have ingredients on hand for this delicious dessert. Use store-brand ingredients where possible to cut costs without sacrificing quality.
Let’s Learn About Cocoa Powder:
Cocoa powder might just be the unsung hero of the baking world. It’s the star ingredient that gives our chocolate cakes their deep, rich flavor, but how much do we really know about it? Cocoa powder comes from cacao beans, which are fermented, dried, roasted, and then processed to remove the fat, or cocoa butter. What’s left is a dry powder that’s packed with flavor and antioxidants. When you add boiling water to the cocoa powder in this recipe, something magical happens—it “blooms,” intensifying the chocolate flavor and ensuring your cake is moist and tender. The next time you’re baking, take a moment to appreciate this little powerhouse of an ingredient, and maybe even experiment with different types of cocoa powder to see how they can elevate your desserts to new heights!