


No-Bake Swirl Cheesecake with Chocolate Topping
Share
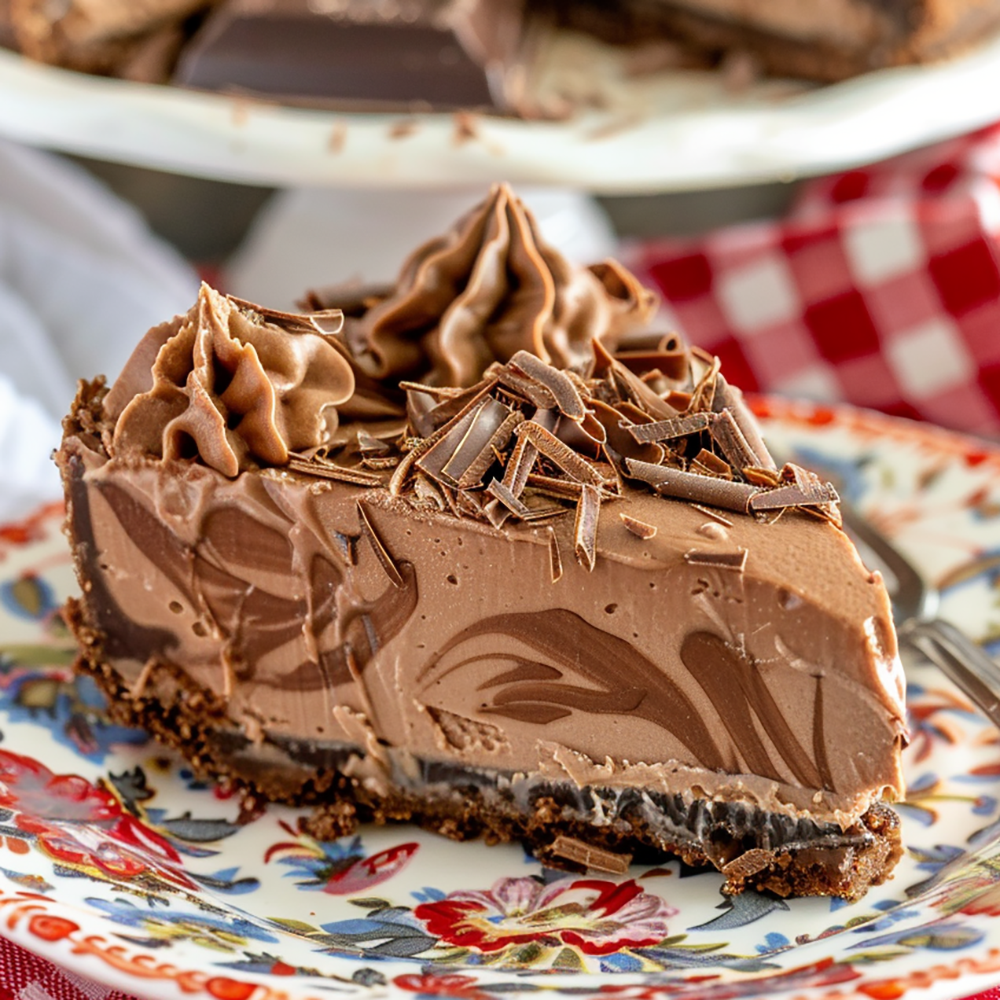
No-Bake Chocolate Swirl Cheesecake Will Wow Your Guests
There’s something special about making a no-bake cheesecake, especially when you want an impressive dessert without all the fuss. This No-Bake Swirl Cheesecake is one of those desserts that look like you’ve spent hours in the kitchen, but it’s deceptively simple to make. The smooth, creamy texture of the cheesecake filling pairs beautifully with the rich chocolate swirls, creating not only a stunning visual effect but also a balanced, decadent flavor. I love how this cheesecake comes together in layers, with the chocolate sauce swirling through, making every bite a little different. It’s perfect for a celebration or a family dinner when you want to serve something memorable but without the need for an oven. Whether you're new to making cheesecakes or a seasoned pro, this no-bake version is sure to impress.
Did You Know?
No-bake cheesecakes are a popular dessert choice because they are simple to make and don't require an oven. This type of cheesecake sets in the refrigerator, resulting in a smooth, creamy texture that's different from traditional baked cheesecakes. The swirling technique not only creates a beautiful marbled effect but also allows you to incorporate different flavors and colors into your dessert. Chocolate swirls add a rich and decadent touch to the cheesecake, making it a visually stunning and delicious treat. No-bake cheesecakes can be easily customized with various toppings and fillings, making them a versatile dessert option for any occasion.
Yield: 8 servings
Ingredients:
Crust:
1 1/2 cups chocolate graham cracker crumbs
1/4 cup granulated sugar
1/2 cup unsalted butter, melted
Cheesecake Filling:
3 packages (8 ounces each) cream cheese, softened
1 cup powdered sugar
1 teaspoon vanilla extract
1/2 cup cocoa powder
1 cup heavy whipping cream
Chocolate Sauce:
1/2 cup heavy cream
1/2 cup semi-sweet chocolate chips
Topping:
1 cup heavy whipping cream
2 tablespoons cocoa powder
2 tablespoons powdered sugar
Shredded chocolate (for garnish)
Instructions:
Prepare the Crust: In a medium bowl, combine chocolate graham cracker crumbs, sugar, and melted butter. Mix until well combined.
Personal Tip: Use the back of a spoon to press the crust mixture firmly and evenly into the bottom of a 9-inch springform pan to create a solid base.
Refrigerate while preparing the filling.
Personal Tip: Chilling the crust helps it firm up, ensuring the base stays together when the cheesecake is sliced.
Prepare the Cheesecake Filling: In a large mixing bowl, beat the cream cheese until smooth and creamy.
Personal Tip: Make sure the cream cheese is softened to room temperature for a smoother mixture and easier incorporation of ingredients.
Add powdered sugar, vanilla extract, and cocoa powder. Beat until well combined.
Personal Tip: Start mixing on low speed to avoid a cloud of cocoa powder and powdered sugar, then increase the speed as the mixture comes together.
In a separate bowl, whip the heavy whipping cream until stiff peaks form.
Personal Tip: Make sure the cream is very cold before whipping for the best results.
Gently fold the whipped cream into the cream cheese mixture until fully incorporated.
Personal Tip: Folding helps retain the airiness of the whipped cream, keeping the cheesecake light and fluffy.
Prepare the Chocolate Sauce: In a small saucepan, heat the heavy cream over medium heat until it begins to simmer. Remove from heat.
Personal Tip: Don’t let the cream boil—just bring it to a gentle simmer for the best consistency.
Add the chocolate chips to the hot cream and let sit for 2-3 minutes, then stir until smooth and glossy. Allow to cool slightly.
Personal Tip: Letting the chocolate sauce cool slightly before using ensures it swirls nicely into the cheesecake without melting the filling.
Assemble the Cheesecake: Pour half of the cheesecake filling over the crust in the springform pan and spread evenly.
Personal Tip: Use a spatula to spread the filling evenly, ensuring no air pockets form.
Drizzle half of the chocolate sauce over the cheesecake filling and use a knife or skewer to create swirls.
Personal Tip: Don’t over-swirl—just a few gentle swirls will create a beautiful marbled effect.
Repeat with the remaining cheesecake filling and chocolate sauce, swirling again to create a marbled effect.
Personal Tip: If you prefer more pronounced chocolate swirls, reserve a bit more chocolate sauce for the second layer.
Refrigerate the cheesecake for at least 4 hours or until set.
Personal Tip: For best results, let the cheesecake chill overnight to ensure it sets properly.
Prepare the Chocolate Whipped Cream: In a mixing bowl, whip the heavy whipping cream, cocoa powder, and powdered sugar until stiff peaks form.
Personal Tip: For extra stability, chill the mixing bowl and whisk beforehand.
Transfer the whipped cream to a piping bag fitted with a star tip.
Personal Tip: For a more decorative look, use different piping tips to create a variety of shapes on top.
Serve: Once set, remove the cheesecake from the springform pan.
Personal Tip: Run a knife around the edge of the pan before releasing the springform to ensure clean sides.
Pipe chocolate whipped cream rosettes on top of the cheesecake.
Personal Tip: Start piping from the center outward to create an even, decorative look.
Garnish with shredded chocolate.
Personal Tip: Shaving chocolate curls using a vegetable peeler adds a professional-looking touch to the garnish.
Slice and serve chilled. Enjoy!
Nutritional Information (Per Serving):
Calories: 550, Fat: 42g, Saturated Fat: 25g, Carbohydrates: 38g, Fiber: 3g, Sugars: 28g, Protein: 7g
Kitchen Tips, Great Ideas, How to Save Money:
- Bulk Buying: Purchase cream cheese and graham crackers in bulk or when on sale. This can significantly reduce the overall cost and ensure you always have ingredients on hand for quick dessert preparations.
- Homemade Graham Cracker Crumbs: Save money by making your own graham cracker crumbs. Simply pulse whole graham crackers in a food processor until finely ground. This can be more cost-effective than buying pre-made crumbs.
- Chocolate Sauce Alternatives: If you don't have chocolate chips on hand, you can use any high-quality chocolate bar. Simply chop it into small pieces before melting. This can be a great way to use up leftover chocolate.
- Reusable Storage: Invest in reusable silicone bags or glass containers for storing leftover cheesecake. These are environmentally friendly and can save money over time compared to disposable plastic bags and containers.
- Energy Efficiency: No-bake cheesecakes are energy-efficient since they don't require an oven. This saves on electricity costs and keeps your kitchen cool, especially during warmer months.
- Smart Storage: Store leftover cheesecake in an airtight container in the refrigerator for up to five days. For longer storage, freeze individual slices wrapped in plastic wrap and foil. Thaw in the refrigerator before serving.
- Ingredient Substitutions: If you’re out of graham crackers, use what you have on hand. Crushed digestive biscuits, vanilla wafers, or even Oreo cookies can be great substitutes. These alternatives not only save money but also add a unique flavor to your cheesecake crust.
- Learning and Sharing: Engage with online cooking communities for more tips and recipe ideas. Sharing your experiences and learning from others can make cheesecake making more enjoyable and economical. You can discover new techniques, ingredient substitutions, and creative ways to use pantry staples.
- Flavor Enhancements: Experiment with adding different flavors to your cheesecake filling, such as a splash of citrus juice or zest, to add a unique twist to your recipe. Fresh fruits like berries can also enhance the flavor and add a touch of freshness.
- Decorative Touches: Enhance the visual appeal of your cheesecake by adding decorative touches like chocolate curls, fruit slices, or edible flowers. These simple additions can make your dessert look professionally made without much extra cost or effort.
Let’s Learn About Cocoa Powder - What Are The Differences - Which One Is The Healthiest Choice?
Cocoa powder comes in two main varieties: natural and Dutch-processed. Natural cocoa powder is made from roasted cocoa beans that are ground into powder without any chemical processing. It has a rich, intense chocolate flavor and is slightly acidic. Dutch-processed cocoa, on the other hand, undergoes an alkalizing process to reduce its acidity, resulting in a milder flavor and darker color. When choosing the healthiest option, natural cocoa powder has the edge because it retains more of the antioxidants and nutrients found in raw cocoa beans. It’s rich in flavonoids, which are known for their heart-healthy benefits. While Dutch-processed cocoa is smoother in flavor, natural cocoa offers more health benefits, making it the better choice for those looking to boost their intake of antioxidants.